Monday, November 26, 2012

Machine Binding

This entry is not for the die-hard purist in you; this is a practical solution to the problem of binding a gift quilt.  First of all, for all my love of hand piecing, embroidery, crewel, etc, I do not enjoy hand-sewing binding on my quilts.  I am not a fast sewer, I try to be meticulous, and I loathe it.  So when I read an article that mentioned machine binding both the front and the back of a quilt, I knew I had to try it.

This past year, I attempted machine binding on several pieces.  It wasn't very successful for a number of reasons.  I gave it up.  Then recently I came across another article in which machine binding was the focus, and the author actually described what she did.  Lights went on again! 
 
Remember the three quilts I made for the greats?  It took two days to square up the quilt (cut all the excess batting and material away in such a manner that the edges were straight and the corners right angles), cut the binding strips and sew them together, iron the binding, pin it on the quilt, and sew.   But I did it, and at the end of the two days the quilt is officially finished (well, except for the label - but that's easy).  As you look at the pictures, remember this quilt is for a child.

 
Machine stitch the binding on the back of the quilt using a regular running stitch, fold it over to the front, and sew the front of the binding (usually with a running stitch close to the edge of the binding where it meets the quilt).  The author of the article suggested using the decorative stitches on our machines especially for children's quilts. 

 
This stitch looks like waves to me.  You'll notice that the entire pattern stitch is on the solid black binding.  It is wide enough to hold the edges down, and I didn't want the stitch to get lost in among the fish.  The variegated thread makes it stand by itself.  I don't think I'd use something this busy on many quilts, but I thought this one could handle it. 

 
Here's the first corner (sorry it's so blurry) on the lower right of the photo.  I learned that even with an even-feed foot my machine could not deal with the added bulk of the mitered corner.  This one will be taken out, trust me.

 
The second corner and then all others were sewn like this.  I'd get about a half-inch away from the corner, use the "needle down" feature, change the mode of my machine from embroidery stitches to a straight stitch, sew the corner, and the reverse the procedure.  It will take some practice to make this better (catching the embroidery stitch at just the right point and making sure the fold over of the miter is properly caught isn't as easy as you might think).

   
A final view of the corner with the squared off method I used. 
 
I've already decided on the stitch I'll use on the two fairy quilts, and for the first time, I'm actually looking forward to sewing on a binding.  Embroidery stitches aren't a requirement; a running stitch in a color matching or slightly darker than your binding will work very well. 
 
With my king size quilts this will make me positively euphoric! 

Sunday, November 25, 2012

Boathouse 3/4

No, that doesn't mean Boat House three quarters; it means Boathouse days 3 and 4 together.  But before I explain the today's title, how was your Thanksgiving?  Did you have a wonderful time with your family?  We did.  Even though we are a very small family, it was good to be together.  The feast was delicious (D makes almost all the "sides" - when did we start calling them that?), and I decided to set a proper table (you know, linens, silver, crystal, etc.) so it looked like Thanksgiving.  It surprised me how much I liked that.  Anyway, even though some of us may have eaten more than we had intended, the joy of being with loved ones made that one day's indulgence worth it.  I do hope your weekend was memorable, too.
 
Now, it occurred to me as I came upstairs to write this entry, that I didn't show you or talk about my progress on the Boathouse painting last week.  I did go to class last Tuesday, and I found myself itching to paint again ever since.  That desire started Friday, but we still had a guest so that had to be delayed until Saturday.  Then on Saturday, I remembered that I also had to work on binding the first of the "greats" (great nieces and nephew) quilts so I did that instead yesterday and part of today.  Once the first one had its binding completed, I headed for my paints forgetting to take a picture of Tuesday's work before starting again. 

What you see below is the result of two days of painting.

 
Sorry about the egg yolk sun peering over a wobbly horizon, but that will be rectified later.   I'm not going to make any more negative observations today (and boy, could I!) or positive ones, either (yes, I could make a few).   I'm wondering if you are thinking the same things I am.  So even though this is still rather early in the development of this painting, what are your reactions?  What do you like - if anything?  What do you think needs work?  It may help you to go back a few weeks to see what I've said about the subject as well as compare the earlier "painting drafts" with this one.
 
One thing I will say, and it's about the writing of the blog rather than this painting, it surprises me how little I now mind sharing work that is still in its infancy.  When I started blogging, every time I posted unfinished creations I thought I would sink under the desk to hide my head in embarrassment.  The work was so amateur, so raw, so un-tutored.  It still is (though I do see some progress) but I no longer mind putting myself "out there" for you to see.    Now I want your honest comments, and I realize that by publishing what I am doing, I see the work in a new light, also.  It distances me from it so I can view it - almost - as a stranger's work.  And I've gotten accustomed to doing it.  Writing about what I am thinking and trying to do, writing about my frustrations, failures, and triumphs, has developed my ability to think about the processes behind the scenes which helps me grow.

"That," as Martha Stewart would say, "is a good thing."

Tuesday, November 20, 2012

Thanksgiving Beauty

Yesterday was the day where you were supposed to get some photographs from our trip to Madison, CT, but instead you had to read about my usual problem of too many projects and too little time.

So today as a way of wishing you a happy Thanksgiving and long weekend (I'll be back next Monday) I'm sending you a photograph of the beach in Madison at sundown.  Hold this picture in your mind's eye as something for which to be thankful - the beauty that is all around us. 


However, we don't have to travel far to find that beauty; it is in the faces of our friends and loved ones; hold them in your hearts. 

And for them I am truly thankful! 

Monday, November 19, 2012

Quilt Progress

How I wish that we were sitting in comfortable chairs sipping our beverages of choice so you could actually answer this question; How are your home-made holiday gifts coming along?  Did you take on too many things to make?  Are you feeling comfortable that - possibly because of the extra time between Thanksgiving and the holidays - everything will be completed in time and will be done to the best of your abilities?  Did you, like me, make a solemn oath that you were not going to make anything, and, again like me, break that oath?  How do you feel about that?
 
Ah well, you aren't sipping hot mulled cider in a rocking chair in my family room, so I guess I'll just tell you how I am doing.  I had said I would not put myself through the craziness of trying to make things this year, but as you know, I didn't stick to that resolve.  I found myself planning to make five quilts and various and sundry small items.  Most of the small sundries will fall by the wayside except for a few special ones, and at least four of the five quilts will be ready for the holidays.  Number four was completed about 15 minutes ago when I sewed the label onto the backing (also just pieced today).  Quilt #5 won't make it in time; it isn't terribly difficult, but I have complicated it by adding my own design ideas to it.  Even if I manage to piece it by Christmas, I seriously doubt that it could be quilted by then.  Besides I have to bind the ones that are finished (but I am going to machine stitch the bindings - both front and back!).
 
Maybe next year I won't make anything.  Or maybe I'll start as ME does in the spring.
 
Nah, I'll be saying the same things next year!  What about you?

Sunday, November 18, 2012

Trip to Connecticut

We are back from a weekend in Madison, CT to visit friends in Madison, CT.  There will be a lot to tell you and photographs to share but not tonight.  I spent too long unpacking, cleaning up e-mail, making both pleasurable and necessary phone calls to be able to write the entry I planned.
 
Bear with me and drop in tomorrow to read about the studios I visited of Connecticut artists and see a few photographs. 

Thursday, November 15, 2012

Eureka Moment

Tonight ME and I went to Applique Club.  After we settled down to our various endeavors, I took out the piece I had taken with me to work on.  It's an applique block to put in my Farmer's Wife quilt, and it was the second time I had worked on this particular block.  The pattern is the traditional pineapple with a horseshoe-shaped wreath beneath the pineapple.  The first time I made it my pineapple was reproduction yellow, its leaves and wreath were green.  So very pedestrian!  I would have liked it better if the yellow and greens were prettier, but to my taste the colors I chose were too dark.  This time my background is red, the pineapple is light blue with squiggly red lines, its leaves are a similar blue with red polka dots, and the wreath will be a slightly lighter blue on blue.  Much more like something I would choose (well, I did, of course, but remember I also chose those dull greens and yellow).
 
As I worked on back-basting the crown of leaves, I thought about how I have struggled with this quilt from the very beginning.  It had started as a challenge to myself, and I have been happy with what I have learned and the experience I have gained by making the blocks from the Farmer's Wife book.  Then why am I still struggling to finish this quilt?  I have 135 blocks completed with only 9 to go so I should be working like crazy to get it done and on our bed.  As I stitched the answer became evident.
 
I don't like the applique blocks from the other book selected to provide them in order to add a new touch.  The patterns are too clunky for my taste.  What to do?  Yes, I could design my own, but I don't have the time or the inclination to put that kind of work into this project.  So up I got to roam the shop looking for a book that might have patterns that I would like.
 
There are so many books from which to choose!  One after another - too primitive, too elaborate, too large - no book of patterns was quite right.  Then ME suggested Lori Smith and Pat said Lori Smith.  "Lori Smith?" said I.  "But she only designs pieced quilts!"  Yes, I know better, but my brain had left the room for a minute.  Going to the wall of Lori Smith patterns, I found the perfect one and it makes a 6" x 6" block - hurray and hallelujah!  Birds, trees, and houses - if it had blocks with stars, I would have swooned so I guess it's just as well it doesn't.

Eureka!

Wednesday, November 14, 2012

Work Day

No photos or interesting discussions of creative doings today.  It was a work day at the Payton household. 
 
Yesterday we started the clean up for the winter in the back yard, and today we continued it.  I thought (foolish me!) that we would be able to get the rest of the yard and the gardens finished, but that was not to be.  Because of the hectic nature of our lives these past six months (wow), I not only did not plant any annuals in the spring, but I also did not cut down any spent blooms, withered stalks, or desiccated leaves in the fall.  I had do take care of that task before I could rake the fallen leaves out of the garden (where they were cheerfully congregating).  And, of course, that task was made more difficult because the leaves were gleefully hiding most of the plants.  It was sort of a which to take care of first - the chicken (plants) or the eggs (leaves)?
 
After two hours of work, I had finished taking care of the old plant material and had raked out half of the garden.  It was lunch time so I called it quits.  D had lunch with me, but then he went back out until four o'clock!  Don't even ask what he did because I'm not sure.  Let me just say that he is particular about preparing the yard for spring or for winter or for Wednesday or four o'clock.  He likes being outside. 
 
While he was continuing the outside chores, I spent the rest of my afternoon doing laundry that hadn't gotten done on Monday, picking up and trying to find places for some of the things we brought back from Dad's house, and washing/dusting some of the decorative items already here.
 
Not a lot of fun perhaps but a very satisfying day none the less.
 
Now about those bindings that need sewing on . . . . 

Tuesday, November 13, 2012

Boathouse Painting Day 2

Great day today.  Not only did I have painting class but I also was able to help D rake the back yard.  We didn't finish that task, but half the yard is finished.  Now we only have the other half and the gardens.  Only!
 
Today at painting I worked on a pen and ink which was not successful.  At least I know what went wrong so I can start over again with the thought that I'll be able to get it right.  Not only that, I know and understand why it went wrong so I can avoid that particular problem in the future.  Maybe.
 
Then I turned to the Boathouse painting.  As I had mentioned earlier, my job today was to use the lessons I learned when doing the pen and ink sketch.  I knew I had to get the perspective of the boathouse right, but since I knew what was wrong, I felt I had a good chance of correcting it.  The trees I had sort of slapped on last week had to go, and the new ideas from the ink sketch incorporated if I had the time (I didn't).  Here is the result of today's work:

 
The trees are still "ghosting", and the boathouse is still "floating in air" but those problems will be taken care in of as the painting continues. You will also see that I began putting in some more reflections which is actually rather silly because the water is by no means finished.  However, it gives me a sense of what I want to do (and what I shouldn't do).  The big rock on the left was pulled closer to the edge of the painting as Sharon pointed out there was too much empty space there. 
 
Frankly, if I were you, I'd look at this and think it all looks rather sickly so I hope you'll stick with me and watch to see what happens.  It will be interesting, I think, if it eventually matches my mental vision.  And you can always go back to the ink study to check on what I keep, delete, or just change.

Monday, November 12, 2012

Estate Clear Out

Saturday we spent the entire day in my husband's boyhood home.  We were lucky that the auctioneer was able to come in and take all the "high end" things AND that it didn't take all day as we thought it might.  Really, the best part of the experience was that Alice (D's sister) was able to drive in to help out as did Rebecca with her husband and son.  With all that help, we were able to sort through photographs and keep an eye on things.  It was rather interesting to watch the auctioneer and his crew.  After we were home again, the second auctioneer called and made an appointment to meet with us today (Monday).
 
Sunday I taught a class and had a bit of time once home to take care of some mundane chores.  My only disappointment was in missing the opportunity the mild weather would have given us to clean out the gardens in the back yard.  That evening both of us did little to nothing, and I didn't even write an entry.
 
Today it was off to D's parents' home for the second estate manager (I really don't know what their official titles are so I just use whatever seems appropriate).  Again, we were lucky as we both liked the man.  He whipped through the house, attics, and basement, but as fast as he went, he missed nothing.  He said there really wasn't anything left of much value.  We expected that so weren't disappointed.  The great thing is that he will take care of getting everything out of the house and leave it broom clean.  He'll sell whatever he can, donate other things that can be used, and dispose of whatever is left.  We won't have to be there (D really doesn't want to be for this part) which is another benefit. 
 
So as you can tell, things are moving along, and we can see the light at the end of the tunnel.   I just feel so relieved that there are people one can hire to do these things so we don't have to.    

Thursday, November 8, 2012

Pen and Ink Study #2

Whew, yesterday I learned that I should sketch the scene for an intended painting before I begin painting it.  So today I did another pen and ink study of another landscape that I might someday turn into a painting.
 
AND of course, I learned another lesson.  This is pen and ink.  It is a study.  It is not intended to be a finished work that would merit framing and hanging on a wall.  Stop when the going is good (that's the lesson)!  Today's sketch was another of the photographs taken PDC (pre-digital cameras) of the road from the south end of the Vermont lake of which you have seen so much over the years.  It is a spectacular view of the shadowed road curving downhill, farm, lake, and mountain all in one fell swoop.
 
There's a BIG hint in that last sentence. I gave you the sequence of what you will see in the sketch from the bottom to the top. Don't be surprised if you have to work at it when you look at my sketch. I warn you now; it's over-worked:
 
 
On the positive side, I do think it would make a good painting!

Wednesday, November 7, 2012

Wrong-Way Corrigan

When you were in elementary school, did your class receive copies of the Weekly Reader?  If you did, you may remember the story about Wrong-Way Corrigan, the pilot who, after being refused permission to fly to Ireland, "misread" his compass and flew to Ireland instead of California.  He flew east instead of west hence the moniker, "Wrong-Way".
 
Well, today I remembered that pilot as I did a pen and ink study for the Boathouse painting after I had already started the painting.  What an idiot!  Oh well, I learned several lessons.  The most important lesson was that doing a preliminary sketch is not only worthwhile; it is critical.  One sees things more clearly while doing the sketch because pen or pencil is more detailed than broad swathes of color spread liberally with brush or knife.  The hand learns how to draw shapes before trying it out with the less specific brush or knife.  When I was painting, I saw only the large shapes (and some not too well!) and had a general impression of color.  I knew what I thought would make a good composition but hadn't figured out some of the problems. 
 
The sketch might be difficult to understand because the reflections in the water are rendered inexpertly with ink and ink wash and the rest of the image is drawn in the same manner.  Differentiating the physical from the reflection will be hard.  But you will be able to get a better sense of the boathouse and its surroundings.  Here it is:


From now on whenever possible, I think I will sketch first and therefore avoid becoming a Wrong-Way Corrigan.

Tuesday, November 6, 2012

New Painting - Boathouse

Voting day is over.  D and I have just returned from the polls, and since I delivered him to the polls at 5:15 a.m., we are both quite tired.  The good news is that it was a very busy day with an exceptionally good turnout of voters.
 
For me it was also a successful day because I began a new painting.  This is another one of the lake from a photograph I took in the pre-digital days.  The subject is a boathouse that is built out over the lake on a footing of cement (no longer allowed!) and natural stone.  It presents several challenges for me, not the least of which is the very subdued palette.  View this photo of the painting as an initial sketch that just happens to be in oils.


My job will be to tweak the perspective which is close but not completely accurate and also to make that perspective believable to the viewer.
 
I think it will be fun watching how this painting progresses.
 
Well, it will be fun for me, at least!

Monday, November 5, 2012

Voting Day

By the time you read this, I hope you will all have gone to the polls and have cast your ballot.  If you haven't been able to yet, be sure to get there!
 
D and I have been spending a lot of time getting ready for tomorrow.  He has to be there around 5:30 a.m. to work the polls, and I have to be up to get him there so I can have the car for the rest of the day.  That full day means that he spent a lot of today doing what he won't be able to do here tomorrow. 
 
After grocery shopping, I spent my time baking a Reuben loaf (bread on the outside with corned beef, sauerkraut, and Swiss cheese on the inside) and an apple crisp for D to take to share.  The group with whom he works is a congenial one and they all have something with them to share.  It's such a long day and they have to be so focused, that it's important to have good food to eat on the quick breaks they allow themselves. 
 
Of course, I won't be able to vote when I drop him off, so I will stop in after painting and crazy quilt classes.  You can be sure I'll cast my vote so I'll have the right to complain if I want to later in the year. 
 
You know how it is; if you don't vote, you can't cast any blame or take any credit, and where's the fun in that?

Sunday, November 4, 2012

Springfield Wool and Fiber Festival

Saturday's expedition was to the Wool and Fiber Festival in Springfield.  It was a great time; how could it not be with all those wonderful colors?  Since I am working so hard on taking charge of my stash, I was determined not to purchase any yarn.  Did I succeed?  For the most part.  I bought one kit ($15.00) that included a tiny amount of yard, beads, and a pattern. 
 
Then I stumbled upon (almost literally) a booth devoted to wool.  Not the spun-into- skeins-of-yarn type of wool but the woven-into-fabric kind. The kind that is used to make wool wall hangings, snowmen, and wool tiles. Oh joyous day! I worked very hard to limit myself to fabrics I knew I needed for the wool project after Wool Tile and did pretty well. I bought the one piece of orange and several different shades of brown that I will need for that project. I also threw in some different greens for leaves for something in the future - my irresponsible purchase. Here they are:

 
One large piece of orange, four rolls of brown (two not yet felted) and four strips of green.  Total price was only $34.00.  Amazing!  I was proud to have resisted temptation (mostly) and to have spent so little money.
 
Later in the day, I found a booth that sold buttons.  With D's help (yes, he actually choose and pulled out possibilities to show me), I bought buttons for wool work, buttons for quilts, and buttons for my crazy quilts.  Gone was my pride in saving money!


Thursday, November 1, 2012

Wool Tile


Disappointing but the wool tile is not yet finished and I wanted it as a gift for this weekend's visit to friends.  Fortunately, I don't really need it as I am providing dinner, but it would have been nice.  Here's what I have so far - pins and all: 
 
 
I was getting ready to stitch the two leaves on the left in place and was pulling the freezer paper off the "lobster claw" leaf when it came apart at the narrow point.  Although I was being careful, it must have been a weak area where the weave was loose.  You can't see it in the picture, but I'll have to re-cut that set of leaves.  The stems are pinned in place, but they do not extend over the leaves; they will end at the leaf's edge and start up again on the other side.  Since stitching sometimes pulls up the fabric, I wanted to be sure I had enough stem to actually meet the leaf at each edge so I cut them extra long.
 
 
In the above photo you can see how I stitched the skinny stems and veins of the big maple leaf.  It's the detached fly stitch, and I like the way it looks - except for the place where I angled the stitches to go up the veins.  It seemed like a good idea, but it isn't completely successful. 
 
What do you think?  Is it the angle?  Or doesn't it bother you?

Wednesday, October 31, 2012

Halloween


Whew, that certainly was me in a "down mood" yesterday, wasn't it!   Today was a better day; both brothers are fine though the one in northern NJ is without power - of course.  So although this is an old photo, it makes me think of Halloween and so is worth sharing again.


Hope you all enjoyed the little ones (and the bigger ones, too) in their Halloween finery!

Tuesday, October 30, 2012

"The New Normal"

I'm going to pass on writing my usual kind of entry tonight; the phrase "the new normal" keeps repeating in my mind like a song you despise but can't get out of your head. 
 
When do you think people are going to accept the fact that what is happening to the weather (and therefore to millions of people across the globe) is at least in part due to our heedlessness?  Tonight on the news, one expert was saying that even if we changed our ways immediately, it would take decades to repair the damage we've done.
 
If you're like me, you immediately start thinking about our grandchildren or the little ones that will be coming to our doors tomorrow. 
 
Maybe. 
 
If the weather will allow them to leave the shelter of their homes. 

Monday, October 29, 2012

Sandy

Poor coastal areas!  Watching the news tonight has been amazing; I can't comprehend the size or ferocity of this storm.  Yes, I look at the weather map and see the area affected by Sandy, but it doesn't sink in.  Fortunately. 
 
My east-coast-of-Florida brother and family are okay.  They didn't get the battering that Florida so frequently does.  Only some rain and wind this time, he said.  My northern-New-Jersey brother and two of his sons and their families may not be faring so well, and that is a worry.  Watching the weather reporters standing virtually in the surf leaning against the wind is beyond belief.
 
The devastation of New Orleans was unbelievable, but as far reaching as it was, it occurred in one locale.  And it was relatively far away.  This time it seems that most of the eastern seaboard and inland, our area,  is going to be wiped clean.  Earlier this afternoon,  our neighbor who vacations in Block Island spoke about low-lying areas of that island and wondered if they will be cut off from the main island or simply submerged.  That made me think about all the islands and low-lying seacoast areas from South Carolina on up and their fates.
 
Will the cartographers be drawing new maps?
 
What shape will recovery take for those who are losing so much?  How can we help?
 
And finally, when will our weather settle back down into its more predictable patterns?  Or are we beginning to chart a new "predictable"? 

Sunday, October 28, 2012

Sisters in Quilting

Pat C has been the subject of an earlier (very early!) entry, and today she is the reason behind as well as part of this entry.  Through her, my special group of women friends, have met Theresa (Pat's mom) and Theresa's sisters, and assorted others.  If I counted right (and it was hard to do because these ladies do NOT sit still for counting purposes!) the Sisters' Group were 8 altogether, we were 4, L and J were 2, the shifting group behind me (whom I couldn't see so they played games to confuse me) were either 4 or 7 depending on when I looked, David (the host and superior chef and quilt holder extraordinaire), and two young ladies-in-waiting.   So depending on when you were trying to count there were possibly 21 or 24 or 32 or 12.  Well, I never was very good at math.  It was a large group.
 
The purpose of this gathering was for the Sisters' Group to have a Show and Tell of all their creations since the last meeting and in particular to show off their Challenge quilt.  Knowing I was in for a treat, I took a front row position on the floor where I could see very well.  I knew these women were prolific, but there is no way I was prepared for the sheer volume of glory I would see.  The first lady showed what I thought were going to be 3, many 4 quilts.  I was wrong.  I think she had 10 (of which maybe 8 were applique).  The next lady showed us 15, and the next one had 25, and the next had 40, and the next - well, you get the picture.  Among the 8 women in the Sisters' Group there were enough quilts to show at Proctor's Theater!  Prolific doesn't even begin to encompass the work these women do.
 
But as special as their quilts were (and I didn't take photos but Karen did so do check her blog!), the beauty, excellent workmanship, and number of quilts is not really the subject of this entry.  Once again, I was most impressed by the community of women.  Yes, these were mostly sisters and probably had been raised to love one another, but more than that, these women liked each other.  They truly admired what the others had created, they admired, they were actively aware of everything that went on, and as I said earlier, they didn't sit still for more than a moment.  Best of all, the laughter, oh, my, the sheer joy of being together.  These are vibrant women, who use everything they can, throw nothing away, give to others, and share their knowledge willingly.  
 
This was a time for them, yet each and everyone of the Sisters' Group and all others who were an integral part of this gathering, welcomed the rest of us whole heartedly.  We could have been an imposition, taking up their special time, intruding on a family, but they never let us feel that way.  The Sisters' Group of women opened their arms to the others of us who were there and made us all one community.

Now, that's power.

Wonder what their adoption policy is?

Thursday, October 25, 2012

Variegated Threads, Continued

Last week I wrote about the discoveries made while working with variegated thread.  Knowing that most of you already knew all about and had vastly more experiences with this subject, I added what I was learning.  Every now and then, while standing in front of thread cabinets pondering my next purchase, I hear someone say, "Oh, I don't use variegated threads."  To me, that's like saying, "I don't use cinnamon."  I do understand that we all have differing tastes, but I can't help wondering if a few of those people don't use variegated threads because it intimidates them.  I hope they'll experiment some day if that is indeed the case.
 
Anyway, here is the completed snowman. All I have left to stitch are the tongues (aka pen wipes) that will be attached on the left and right and the backing. I hope hesitant stitchers will try variegated threads because I had such a ball stitching this little piece! 
 
 
The pattern had some elements that I changed.   I redesigned the snowflakes on the body of the snowman. Oh, and those irregular squarish coal-for-buttons? Glued on and then secured with honking-big French knots and single-strand black embroidery floss for coal-nugget eyes and smile. A more noticeable change was the branches that are the snowman's arms.  They are supposed to have green leaves, but that didn't seem right.  It's winter!  So my branches are from an evergreen and have needles and pine cones (one strand beige and one strand darker brown in French knots) .  The black bird is a red one singing with spread wings.  


Below you can see what I did with the carrot nose.  I had discussed using the thread to indicate the ridges in the carrot, and it worked well - makes it look more, well, carroty!   Fortunately,  I was able to find some appropriate buttons in my button collection to add that missing little something to the stars.  By the way, here you can see what I meant when I mentioned how subtle the variegation often is in Valdani threads (which I used on the stars).

 
This sort of folk art piece is a wonderful place to try new threads in an obvious way.  Clearly, it gave me a lot of pleasure.  I'm about to start a new piece where the thread choices will be more subtle.  It will be interesting to compare the two pieces. 

Wednesday, October 24, 2012

Quilt Mystery

As I was looking for a particular photograph in my files today, I came across three from the Gilbertsville Quilt Show I had wanted to share with you. Here they are with the description and attribution first:
 
 
Now the pillow cover.  Isn't it amazing?  Have you ever seen anything like this technique?  I believe I know how it is made, but I wish I could have seen the back to be sure.

 
The next two are close-ups.  Can you figure it out?

 
Just imagine the time it took to collect all these fabric snippets.  Or do you think there was an exchange among the local women so they could all make one of these pillow covers without collecting for years?

 
It looks like a Crazy pillow, doesn't it!

Tuesday, October 23, 2012

For Fiber Fans

Our next door neighbor is a friend as well as a neighbor, and he is often a guest at our house to share a glass of wine and companionship.  The last time he came over, he had recently been on his annual fall trip to Block Island, and he brought over some items he bought there that he knew I would love to see and touch.  He was right!
 
The first item was a stunning "rug", perfect colors in stripes with fringe at either end.  You see it in the first picture on my couch; I think the color combination is wonderful!  In the second photo, our neighbor holds it so you can get an idea of size (he is over 6').  He said he has no intention of walking on it because it's just too special to "get all muddy" and I agree.  He's going to use it as a wall-hanging.  Won't that be striking! 


The final picture of a hat and the advertising materials has a special story.  As you can tell from that rug, this fiber source produces products as well as yarns.  Neighbor wanted a warm hat for winter wear and tried on everyone they had on hand.  They weren't big enough.  Usually, that would earn a shrug and a, "Sorry, we can't help you", but not in this case.  The fastest knitter was summoned, his head was measured, yarn and pattern chosen, and he was told to come back later.  He did, the hat was ready, it fit, and he did not have to pay extra for the custom work.  The yarn is an alpaca/bamboo blend so it's as soft as can be.


The following description has been copied from their site (address below):

Block Island Made Exotic YarnsNorth Light Fibers is proud to introduce a new and expanded assortment of exotic yarn blends for knitters, weavers and weavers. These yarns are specially designed and hand crafted from exotic fibers based on our experience and feedback during our retreats as well as from all the knitters and weavers we work with.

For example, our Forever Yarn blend consists of 80% baby alpaca and 20% bamboo to create a strong and soft yarn that has a light hand feel for optimal lace knitting or warp/weft tension. In addition to our
exotic yarns, our colors are developed to create unique depth, richness, and surprise. We spend a great deal of time on color theory in order to help you create beauty. Given our approach, we name our handspun yarns and colors as each is "one-of-a-kind" like your knit and woven creation.

All of our yarns have a natural or specialty developed color of blended exotic fibers such as baby alpaca, buffalo, yak, camel, merino, bamboo, silk and soy silk. Our yarns range from
lace weight yarns, fingering yarns, sport weight yarns and worsted weight yarns to rug and large super chunk yarns. While baby alpaca is our primary fiber, please look through each of the yarns on the following pages and call us if there is something you would like. We are always making new blends of exotic fibers and unique colors for your knitting, weaving and crocheting pleasure.

http://www.northlightfibers.com/

Did you notice the bit about blends, "Call us if there is something you would like"?  If you're looking for nice yarn for those little gifts you need for the holidays, consider North Light Fibers.


Monday, October 22, 2012

Perils of Watching Late Night Debates


Sorry, but I watched the final debate and the commentary that came after (though only on two channels) tonight so I find myself unable to come up with a coherent sentence!  All I can do is yawn so I'm off to bed.  More tomorrow - but NOT about politics!

Sunday, October 21, 2012

Search for Beauty

My challenge to myself today was to find beauty in my garden even though there is nothing in bloom and the trees are almost leaf-less.  The first thing I saw when I went out back was the weeping crabapple that is almost completely bald.  Unfortuantely, the photo I took in which that tree is the star does not make a very convincing argument.  So I took another try and used the branches of the American beech to frame it and add that dash of color.  Now I think it works.


"Birdhouse with Antenna" is what I think I will name this next photograph.  Imagine the bird who lives in that house complaining that even with the biggest antenna money can buy, he still can't get the Antarctican Emperors vs Ice-Cold Seals games!  This is an example of, "Oops, I didn't notice that!" picture-taking.  But it's worth it for the laugh.

 
Finally, there is pretty picture of my neighbor's tori gate with his fading mums below the gate and the almost-gone burning bush in the background.   Even the hanging pot with its skeletal stems and the exhausted "bird" on the gate add a few touches of whimsy. 
 
 
Now are these lovely pictures that I'm going to run upstairs and turn into paintings?  No.  But are these photographs that make me see there is still loveliness around me?  Yes!
 
So the next time you hear me bemoan the coming of November and its gray and brown palette, smack me on the head, and remind me to look for beauty because its everywhere.

Thursday, October 18, 2012

Lessons Learned - Variegated Thread

Aren't variegated threads beautiful?  There they sit in the thread racks next to solid colors, and they almost bounce off the racks in their glee over their glory!  How can one resist them?  As you will soon see, I can't.  BUT, I am slowly coming to the realization that one must think a little, plan ahead even, before plunging a needle full of variegated thread into one's fabric.

One of my current activities that I can share with you is a wool project. It's a simple pattern that I've had as a kit for several years now - basically, it's a snowman. When I started sewing the ground onto the sky, I reasoned to myself that I was dealing with a snowman so I should use a thread that spoke "Snow" to me. Wildflower Threads has a gorgeous light blue/white variegated thread (I think its name may be Glacier or something like that). So I started my stitches. I didn't like it but kept going. After three inches, I stopped because I still didn't like it. It was too white, too stark on the black ground, and I had stitched three inches and the blue still hadn't appeared (wish I had taken a photo of it, but didn't). So I switched to a thread that had blue/lavender/brown/and more, and oh, what a difference! It said, "Snow in Shadows" to me.
 
 
You can see it very well in the first photo above but not so clearly on the curve of the snowman where the same thread seems lighter (it isn't - another trick of the light).  The second photograph shows the white/blue thread on the body of the snowman where I stitched a snowflake tonight.  I like the thread here because it was on the off-white color typical of wool with no competing dark color to make the contrast glaring. 
 
I was finally beginning to realize how to choose a correct variation of colors, or at least I hoped I was learning because my next thread choice was for the tweedy stocking cap the snowman is wearing.  Click on the photograph so you can see a larger version.  The thread was chosen because the colors were close to but not exactly like the ones in the tweed.  Also, I engineered it so the lightest/brightest colors of the thread were closest to the pompom on end of the hat where it would be farthest away from the head of the snowman (trying to be aware of competition).  Still on the stocking cap - because the cuff and pompom of the hat were made of the same material as was used for the snowman, I chose a different, almost solid color (Valdani thread) so as not to combine snowman and hat as one.


The stars were easy; it was the Valdani thread again.  Since there is a clear separation of stars and stocking cap, it shouldn't raise confusion by being the same thread.  It also more clearly has (on the stars) a slight variation of color.
 
Here's what I've learned so far about using variegated threads: 
 
Consider:
  • both the fabric on which you are sewing and fabric behind it  - keep a color separation between the two
  • if you are working on dark fabric, the lightest color in the thread (darkest color if working on light fabric) will be the most obvious - so obvious that it will seem as though it is the only color
  • the composition as a whole - can you use the same variegation in different places for different elements?
  • what elements of the design do you want emphasized with the colors in the variegation?
I'm sure there will be more things to learn as I continue with both this wool project and the several that are waiting in my stash.  And of course, these considerations carry over into other creative activities, too. 
 
Now on to his arms!

Wednesday, October 17, 2012

Nothing to Show

No photographs today, but I can report that today the pen and ink sketch of the heron is no longer black and green.  Now that it is thoroughly dried the ink that was green yesterday is brown today.  Curious, no?
 
Today I spent my time on a lot of little things.  As a result, I did a lot but have nothing to show for it.  Frustrating.  I did things like trace a design onto refrigerator paper for wool work, finish the hobby painting I started yesterday, conduct the daily fabric review, perform household chores, go grocery shopping, and that's about it.
 
There must have been something else!  Oh, yes, wait for the furnace man to come to do the yearly clean and check of our furnace.  Wow.

Tuesday, October 16, 2012

Painting and Quilting

What a day!  I had time today for my painting class, stash-busting, piano practice, walk, and quilting - all in one day; what's not to like?
 
This was my first painting class in longer than I like to remember.  First the problem was my eyes, then our travel schedule, then my father-in-law's decline and death, the estate busy-ness, and now?  Voila, back into some of my favorite activities.  I took one of my older photographs (pre-digital camera) with me to use for a new painting.  It presents some issues I need to resolve before embarking on a larger painting - different subject but similar problems.  However, today's class was geared around a lesson on pen and ink drawings - something the class had begun last week.  Rarely one to pass up an opportunity to learn something, I put aside my plans and decided to work on pen and ink even though with the way the class is structured, I didn't have to.
 
It's been a long time since I've used pen in drawing and even longer since I've worked with ink washes.  Today's mini-workshop was terrific!  After a brief slide show of pen and ink drawings with descriptions of techniques used, we were encouraged to try doing some experimenting on our own.  I love the way Sharon teaches.  We were each given three different types of  paper (regular flat surface drawing paper, watercolor paper, and a rougher watercolor paper), and if we didn't have one with us (fortunately I just happened to) a pen with the right kind of ink.  We didn't have to make a drawing or do anything we didn't feel comfortable doing.  Each one of us did something different, but we all experimented first.
 
I decided I would draw the subject of my planned painting and include my experimenting in it.  So in the upper left I made some squiggly lines that could be used for leaves.  Then a bit farther down the same side I drew hard straight lines and some cross-hatching (parallel lines crossed in the opposite direction with more parallel lines).  Then I applied a bit of water to create the wash (later I applied water to the surface first and experimented by drawing on a wet surface).  I did that on all three papers.  It didn't take me long to decide I had to use a watercolor paper.  As we were doing thing, Sharon came around and gave each of us one larger piece of watercolor paper.
 
Here is my drawing:

 
The different colors were caused by also experimenting with a different pen that had a different ink.  I certainly didn't expect black ink to become greenish; isn't it neat?

Monday, October 15, 2012

One Project Finished!

After reading the title of this entry, you may be all excited for me thinking I have finished the task of weeding my stash.  Sigh.  That will take quite some more time even though I do a little work on it every day.
 
No, today's excitement is that I have finished making two Lazy Girl wallets.  It doesn't take long to do these handy little wallets, and since I've made several, I can almost do them in my sleep.  The issue is that recipient is in her twenties and therefore likes simplicity, probably no flowers, and neutral colors.  In other words, she's my opposite.  Once I realized that, I chose what I think are appropriate fabrics, but I'm nervous about whether or not I was successful.  One way or the other, they are finished.  
Batiks
The batik wallet may be my better choice of fabric lines and colors.  The outside of the wallet is a black/gray stripe and a black and gray geometric design.  
William Morris fabrics

The photograph of the William Morris wallet has done strange things to the colors. However, the outside is taupe and gold (no metallic threads) roses (they're small flowers!), taupe leaves, and a gray background. The bottom portion is also a William Morris fabric and it matches the taupe of the leaves above. It is not green! 
 
After some consideration, I did not put buttons on the outsides of the wallets but opted for simplicity instead.  Buttons aren't really needed with the Velcro anyway.  I even managed to get these in the mail today (they must be in CA for a Halloween birthday).

Now I am back to sewing for Christmas.  It is a bit late, isn't it?  Wish me luck getting things finished!

Sunday, October 14, 2012

Halloween Tree as Inspiration

By now, if you've been reading this blog for a while, you know my fascination with trees.  Several have been discussed in various entries - some with photographs and some without.

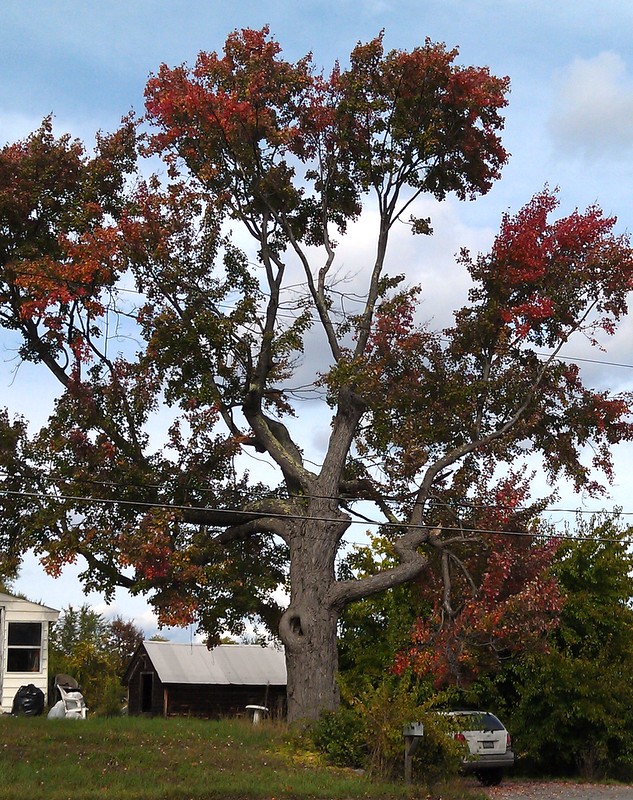
Well, last week I finally managed to take some pictures of what I call my Halloween tree.  Here's how it happened.  I had been out running some errands without D who things to take care of at home.  My last stop was at the grocery store and after that I drove through some little back streets to get to a road that leads more directly to our home. 
 
Since summer I have been reminding myself to take a picture of this particular tree in the fall.  It had to be fall because the nature of this oak tree demanded it, and because I really don't know how much longer this tree will be left standing.  It stands beside a farmhouse surrounded by fields that are no longer under cultivation.  The farmer from whom we bought vegetables in the summer thirty years ago was an older man at that time.  And he has since died.  You know what happens to small farms in that case.  The fields have been allowed to lie fallow for years since, since as he aged, the farmer couldn't keep up with the farming.  Parcels of land were sold.  Since his death, his family has not been able to keep the house from its slow decline.  Sadly, I predict the land will be sold - sooner rather than later - and this old oak will be cut down to make way for whatever buildings will go up.  Indeed, it may not last even that long.
 
Anyway, I realized as I drove home with my groceries that I had forgotten to stop for the picture, and I didn't even have my camera.  Thank goodness for cell phones!  I turned right around and drove back through the windy streets so I could reach the perfect vantage point for this tree.
 
 
Here it is.  Can you see why I named it as I did?
 
 
Another view that includes the old farmhouse as well as showing the spread of this old fellow.
 
 
This final shot should make clear why I named this tree the Halloween tree.
 
What will I do with these particular photographs?  I can imagine this tree showing up in a quilt.  Just look at that branch on the right as it zigzags into the distance and others that in typical old oak fashion bend in impossible curves.  Then there's that remarkably large hole; what do you think lives in there?  Or if you look up at the second picture, I can see a painting (edited, of course).  Look at the open door (open to what? to let something in or to encourage something to exit?)  and the blank staring window to the door's right.  Notice the siding and the general slide toward decay.  Then you can see the barn behind the oak tree and the poignant tilty birdbath. 
 
I mean no disrespect towards the family or the property.   Instead I like to chronicle my flights of fancy; the writing of this blog fixes my impressions in my mind and helps me remember them later.  My imagination likes to develop stories to match what my eyes see.  For example -
 
Where do you think Jack and King Crow  (from "Jack's Wild Ride") might be in this setting?  Where have they been, and what are they doing now?


Thursday, October 11, 2012

More Quilts from Gilbertsville

Today the entry will feature more quilts from the Gilbertsville show with some explanation of why they are included:


I love this pattern even though I will probably never make it.  It isn't because of all the triangles; it's because of all the tiny triangles!  There are so many quilts I want to make and many more I want to design and make, that I am beginning to realize some favorites will have to fall by the wayside (or seaside, in this case).  Do read cards for these quilts - some, like this one, are quite interesting.  Did you ever think you could earn a master's degree by making a series of stunning quilts?  Wish I could find Mary Krupp and shake her hand!  An MA that was quilt-worthy.  I love it.  And this is a great examples of why it's quite all right to use different focal and background fabrics!  See the depth in this quilt?


 This is why I love going to quilt shows; I get so many ideas.  Now I am not sure if this is an Alaskan-only pattern, but I thought it is a super way to journal/quilt a trip or an event.  One could use fabrics as this lady did, or your own photographs, or your own drawings or embroidery.  It's a memory quilt pure and simple and heaven knows many of us could use the memory boost!


With this one, you must read what Dorothy Caroll says about her quilt and her philosophy of saving vintage doilies in an "as is" condition.  While I don't agree with her on that point IF you have some good information about how to restore (stain removal especially) such finds, I love the idea of this quilt since I, too, collect vintage linens and needlework.  My particular favorite at the moment is bits and pieces of tatting.  Most of that comes in small pieces that I plan to use in crazy quilts, but some of it could use a larger showcase like this one.  And isn't her reason for using batiks terrific?  Another quilter whose hand I want to shake. 
 
I hope that by now you have noticed that not all of the quilts I chose to share were award winners even though some were quite fine examples.  Some of the quilts in these entries were made by people whose (gasp) points might be cut off, applique stitches might show, borders might sag, and so forth.  Early in my quilting career I might have been disdainful of such work and might have made mental notes about the errors (but I assure you I did not voice those thoughts out loud as some do - do they ever realize a new and proud quilter might be standing right behind them?), but fortunately, for the most part I have gotten over that.  Now I admire the quilters for the courage to "put it out there" for critique, for the determination to complete a project, for what I hope is their pride and pleasure, and finally, selfishly, for all the joy I get and all the wonderful ideas.
 
Now I'm off to watch the debate and you can be sure I'll voice my opinions - quite loudly, too!