Sunday, March 31, 2013

Weekend Accomplishments


It was one of those weekends when several small chores that have been on the chore list for a relatively long time actually got done.  The first chore is something D did for which he'd had to wait for the ground to thaw.  He put up birdhouse #6!  I'm quite excited about this one for several reasons.  First, we found it in D's childhood home, second we like its shape and the colors plus it has a tin roof, and third, it's the first birdhouse in the front of the house.  It stands in the back of the white flower garden behind the white rhododendron that blooms twice a year - in the years that it feels like blooming.  My hope is that it might encourage the robins to nest somewhere other than over our front door light.  The opening for this house is probably too small, but still, I hope.  By the way, did you notice the background?  I mean the leaning oak tree on the right with the counter-leaning fence behind it.  Funny . . . or at least until the fence decides to fall!


A second chore was mine, and it was quite easy.  The difficulty lay in managing to have my camera with me in the morning of a bright day.  I had a tree that I wanted to collect, and there it is (oh, it also had to be when the tree didn't have any leaves).  I suspect this is an oak given the way the branches are growing, but I'm not sure.  Sorry about the power lines, but sometimes one simply can't avoid them.  I needed to be far enough away to get the entire tree and didn't want to encroach on private property.  At first look, it may not look like a very special tree until you look closer.  See the detail below?  This tree has the most wonderful twisted base that continues almost to the top of the house on the left!
 
 
I wish I knew an aborist who might be able to tell me why some trees do this.  As you can see, the tree has no competition and certainly appears to be healthy (just look how tall it is!).  Maybe I can have D ask his bonsai teacher.  Whatever the reason, I now have a wonderful specimen for sketching.
 
Which is something else I did this weekend.  I sketched a solitary waterlily with its leaf/pad that may be my new painting - possibly starting this week - again on that too-large-for-the-computer-to-copy paper.  So I won't say more about it until I find a way to share the sketch.


Thursday, March 28, 2013

Crazy Quilt Class

Not only was I able to accomplish the tasks I set for myself today, I was able to both start a new crazy quilt block and attend a CzQ class in the evening. 
 
The block I started today features a photograph of my great-great grandmother as a young woman, and I am pleased with the fabrics I chose to put in the block.  The last block I started with my sister's photograph left me feeling dissatisfied with my choices of colors.  Whether to start over with that one or not is something I still haven't decided, but I think I should work on it before tossing it away.  Embellishments change the appearance - sometimes radically, and as our teacher says, I tend to "encrust" my work heavily.  That will either save the block or not. 
 
It was fun to take the evening class (I'm usually in the daytime section) because I was able to see work done by different people.  One woman is starting a project with lots of photographs - mostly children I think, but I didn't get a close look.  It will be exciting to see how her work evolves.  A friend, LP, was also there which was a pleasant surprise as I haven't seen her for a while and didn't know she was "into" crazy quilting.  Her pieced blocks were lovely; she had very striking velvet centers in both.  She explained how she had made them appear raised which also added texture to the appeal.  However, her blocks are quite small which for me would be a challenge.  I'm looking forward to seeing how she handles it.  ME worked on her special project, but she, too, is talking about starting over.  She marked her light fabric with a dark marker and isn't happy with that.  Also, there's a new, gorgeous gimp for her to couch which will both save her time and make her stems striking instead of merely there.  I can hardly wait to use some myself.
 
You see, there's always something new or a different way of doing things that keeps this activity fun.  For me, it's also so much more creative than - well, than sewing binding! 


Wednesday, March 27, 2013

Cutting or Sewing?

D's birthday is coming in mid-April.  The fact that he is away on an overnight business trip today gave me opportunities.  Initially I didn't know how best to use my time, but today's experiences (after too much time at the dentist and errands) answered any question I had.
 
You see, while I have some gifts for D, I want to make him a shirt from some fabric I purchased for that reason several years ago.  I've made a couple of shirts for him that he has enjoyed but can't wear as often as he'd like because he really needs long sleeve protection from the sun.  That meant that I had to purchase a new pattern - not so much for the sleeves which are no problem but for the cuffs and vent.  I tried to find such a pattern that did not also include a yoke (adds time to the construction process), but the local store was out of any like that.  Ah well, what's a few more minutes when the shirt itself will fit and look better? 
 
So today I began the tedious process of cutting out said shirt.  "Tedious?", you ask.  "What's the difference between cutting out a shirt and cutting out a quilt?"  Funny you should ask.  Remember how much time it takes to fussy cut for a quilt?  Now add that fussy cutting time to not being able to use a rotary cutter (with practice, I probably could, but I haven't practiced).  This is a fabric that requires matching pieces as you can see below.
 
Find a part of the pattern like the batter standing ready to swing his bat.  Then find where he appears again.  See how the pattern repeat shifts?  Now imagine matching the front pieces where they meet to button.  Takes a bit of time.  Then there are the sleeves which need to be the same (no way to match to the body of the shirt) followed by the yoke to the lower back.  Sigh.  It takes time, and sometimes you just have to forget perfectionism.
 
The second thing I'd like to at least start is the Shoji pattern I wrote about a bit ago.  In the photo below you'll see the table runner size I plan to make at the bottom right of the pattern.  You'll also see the fabric I chose to use.

 
At least I solved my quandary - to cut only or to cut and sew?  After today I know I should do as much of the cutting as possible.  You see, D comes home tomorrow, and I cut in the kitchen.  He wanders through many, many times a day and might grow suspicious if I throw my body over the table (in an effort to hide what I'm working on) every time he enters the room. 

 
Tomorrow I'll cut the Shoji screen fabric (above is a better picture of just the fabric) so it'll be done before he returns.  He doesn't get a clear look at what I'm sewing when I'm at the machine so I should be able to keep things hidden from him.
 
Who knows?  Maybe I'll even be able to cut out a summer nightshirt - at least for that one I won't have to match every detail of the fabric!

Tuesday, March 26, 2013

Quilting Tales' New Design

So, what did you think when you first saw my blog yesterday?  For a couple of months now, I have been trying to change the appearance of Quilting Tales using a photograph of my own.  It hasn't worked very well.  The few photographs that were of the right size or right number of pixels or right something or other just weren't what I wanted.
 
When I first started writing Quilting Tales, I knew nothing about blogs and didn't even read any.  The design process to set this up was nothing like anything I'd ever done before, and while it was really quite easy and there are choices, I "settled" on the book background because it seemed to represent me at that time.  It was the only one that "fit".  However, now while I still love to read and discuss books, I am no longer an English teacher, and there are other things that keep me engaged these days (as you may have noticed).
 
This background struck me first of all with its color.  I love the muted sea glass green with the grays which make the first impression.  Then there's the easy chair which I like to think is there for you as you read this.  And do you notice what is above the chair?   Yes, art!   Wonderful gold frames around what could be Old Masters.  Then just above the word "Quilting" you can just make out - could it be?  Is one of my pen and ink drawings?
 
There's also an almost hidden screen which might show a movie if you find the remote, and just behind the text, do you see?  An old-fashioned rotary wall phone in an oak case so you can call me.
 
It would be perfect if  only there were . . .  
 
Send me a comment and tell me what you think is missing.

Monday, March 25, 2013

Scattered Buttons Quilt

This entry will be mostly photographs of the renamed quilt.  It's difficult to see the point of the new title, "Scattered Buttons" until you look through all the photos, especially the two close ups.
 
 
The first three shots were taken while the quilt was on the family room floor and I had merely set the buttons out to see where I wanted to put them.  Then I basted them on while still on the floor (which took 2 evenings to complete).  The next two close up are to showcase the buttons.  These come from my collection of  macaroni buttons, or to be technical "extruded" buttons.  All of the pieces on this quilt are early plastic, but the macaroni's are my favorites.


This final picture shows the quilt with almost all of the buttons basted in place and hung up in the family room.  I did use the flash to pick up the buttons a bit more because they are so similar in color they tend to blend into the background.

 
Even though this demands close inspection to really appreciate the embellishment, I felt that the limited palette of the quilt plastic paired with the limited colors available in the early plastics was appropriate.
 
By the way, my love of the "macaroni's" started when my mother made me an evening coat to go with a dress made for my senior prom.  She used three large pearly white macaroni's (from my grandmother's button box) on that coat, and it's been love ever since. 
 
Sigh, I still have those buttons, but they are so fragile that the shanks broke off and they can't be sewed on this quilt.  However, I am still collecting them, and you never know what I might find!  

Sunday, March 24, 2013

Quilty Doings

It was a wonderful weekend despite the weather.  Wonderful because I accomplished a lot and also was able to spend time with a special group of friends (our at-least-once-monthly meeting that doesn't always happen met today!). 
 
First, a catch up on some of the UFO's I've been trying to finish.  This particular group of UFO's is a sub-category that I call ABBS  (All But Binding and Sleeve).  You'll hardly believe it, but as I was finishing the binding on the quilt I called "Recess", I ran out of the variegated thread I was using!  Remember that happened with the brown thread I used for the
"Spring Baskets" quilt?  Could I even begin to believe it happened again?
 
So off I went to JoAnn's (it wasn't the top quality thread but not bad) who is the only supplier around here for that particular brand.  You know what I'm going to say.  They didn't have any.  On the way home I thought I had a solution; I could turn the quilt upside down (I still had the correct thread in the bobbin) and sew it that way.  Once I arrived home I realized I would have to baste the unfinished part of the binding so it would stitch up smoothly even though I couldn't see it.  Ugh, too much work!  While I sat at the sewing machine, I had an eureka moment.  I now have a Janome machine so, unlike my old one, maybe the bobbin would fit on the thread spindle?  Yes, hurray, another finished quilt!
 
Well, almost.  After two more days of sewing, "Recess" has been renamed.  It is now "Scattered Buttons".  I will try to get a decent photograph that will show you how it has earned that new name.
 
Then I made three more sets of pillowcases.
 
Today was such a terrific time with my friends and all but one of our group were there.  We shared what we were working on, ME finished one lovely project and started hand-quilting another beauty, KM worked on binding a HUGE and handsome quilt, hostess NL worked on a very special counted cross stitch (no mean task as she now awaits her cataract surgery), I, too, worked on a counted cross stitch project as a change of pace (at least I could see what I was doing!), and PC? 
 
Well, PC put us all to shame.  She came with TWO Blocks of the Month (aka BOM) on which she is working.  One is all batiks which is a change from PC's usual, in a Lori Smith pattern so you know it's spectacular.  The second is both piecing and applique.  It was the barely started applique block on which PC worked and FINISHED while chatting with us all.  Naturally, it is perfection!  Having recently returned from the Lancaster show, she had many other drool-worthy things to share with us.  Oh, the patterns, the kits, the BOMs! 
 
Just you wait.  It's difficult to refrain from adding to the pile of "must-do-someday's" when confronted by such bounty!

Thursday, March 21, 2013

Adriano Monocchia, Artist

This evening D and I went to a book signing by an artist friend of ours, Adriano Monocchia,  then out to dinner with him and his wife followed by a longish drive home.  It was a wonderful, successful evening for him but late enough so this entry will be super short.
 
Let me direct you to his website so you can enjoy the work of a professional artist.  Both his subject matter and his style differs markedly from mine (did I mention he is a professional artist?), and I think you will appreciate both.  So here is his site with his new book on the home page:
 
 
Enjoy!

Wednesday, March 20, 2013

Circles Technique Class

Today ME and I took a class in circles.  Sound strange, doesn't it?  This class was billed as a techniques class designed to help us with circles.  That means that we started with how to use a particular ruler to cut a perfect circle using only the ruler, a rotary cuter, and fabric folded in quarters.  Once we mastered that, we moved on to how to cut the background fabric for that circle using the same three items only using a different fabric. 
 
Next came how to fold both circle and background fabrics to created 8 register marks.  Those marks would guide us in pin placement using only 8 pins.  Then we after being given a few more tips, we sewed our first circle.  Then another, and then another, and then . . .
 
We learned how to create intersecting lines and what the width of the intersection would do to the circle unless we took the necessary steps.  Here is the block ME made.  I wish the colors were more accurate (the upper circle with the little flowers is a deep, rich plum), but at least you can admire how she applied her knowledge and was able to sew the circles into her background fabric.
One of the samples Marlous brought with her (and she brought many) is the one below.  It is a sample that uses the Drunkards Path block (a quarter circle that can be made using the technique we learned today).  Both ME and I took a circle class when these patterns enjoyed a resurgence of popularity.  But as you all know, if you don't practice a method, you forget how its done.  What we learned today is different, and I think better.  We also learned many different ways to apply what we learned.
 
 
I can hardly wait to use some of the ideas with these new techniques!


Tuesday, March 19, 2013

Painting Finished!

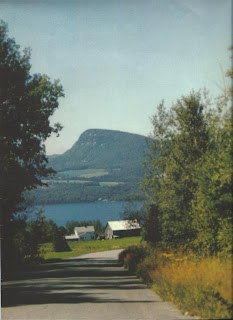
"The Road to the Lake" is officially finished! I thought you might enjoy seeing the photograph (an old-pre-digital, enlarge photo) that served as my source for the painting.  You will see how I altered reality to suit what I thought would make an interesting composition.  What I find interesting is how my palette in all the lake paintings (three so far, does that constitute a series?) is bright.  That tells you how I feel about this place.  Oh, and since the photo was taken there was a significant rock slide on the mountain that took out many trees (as well as a good chunk of the road on the other side of the lake) which is why the bare rock face in my version is so easily seen - can't take credit for that.  The image is 9" x 12". 

 
And the finished work.  The dimensions of the canvas (15" x 30") I chose makes quite a difference, too.

 
Ah well, on to the next one!

Monday, March 18, 2013

Spring Baskets Quilt

Yesterday I mentioned the Spring Baskets quilt that was no longer in the UFO pile, but I hadn't taken a picture of it.  This afternoon when D came home we hung the quilt, and now there's a photograph to share with you.

 
It all sounds so easy, "We hung the quilt."  But it really isn't, and D is such a good sport about it.  This wall hanging is in our living room over our old upright piano so you can begin to imagine the difficulty we have changing the quilts there.  D has to go out to the shed to get the step ladder and then actually stand on the piano to put up the quilt.  It's a good thing he's quite trim!  You can also see the painting "Boathouse" on its small easel; it's there because it's an out-of-the-way place for it to dry.  Even though the colors aren't at match, the two - quilt and painting - make a good pair.

 
Here's a close up of the quilt with its 12 baskets.  Six of the baskets hold rabbits fussy cut from the border fabric and six hold flowers from a different fabric.  I mentioned that this project was one of the "Small Quilts" class I took, but I'm not very good at making small quilts (yesterday's "Cabanas" a notable exception!).  If I remember correctly, this quilt was supposed to have four baskets.  It was too much fun to resist the impulse to add to it!
 
The pale colors and the subject matter will make me think "Spring" even if tomorrow's weather does revert to "Winter" so I'm very glad it's up!

Sunday, March 17, 2013

Tackling the Pile of UFOs

Finishing things I start is seems to be low on my priority list.  At least is seemed this way after I finished my cleaning and tidying of my sewing work space last week.  Refusing to count the number of UFO's (Unfinished Objects) was probably a smart move as the number might have sent me into a downward spiral.  It certainly seems better to count the ones I do finish, don't you think?
 
Until I ran out of a truly lovely brown thread, I was getting a lot done so I will share what I did accomplish.
  1. Hand-sewed the binding on my second Spools quilt (the one with the embroidery in the center) and the bottom of the sleeve so it can finally be hung.  Left to do?  Make and attach a label.
  2. Trimmed, machine sewed sleeve, made binding, sewed binding on the spring basket wall hanging I made in K's "Littles" class (used a lot of the brown thread).  Left to do?  Hand stitch the lower edge of the sleeve tonight and make a label - someday.  Hang it tomorrow, take a picture to share.
  3. Trimmed, machine sewed sleeve, made binding (ran out of brown thread so couldn't sew binding on) for the quilt I purchased from a quilt teacher and good friend. Left to do?  Sew on the binding, hand stitch the lower edge of the sleeve and attach label.
  4. Removed the way-too-bright-orange sashing from my "Cabanas" wall hanging (from Lisa O'Neill's book Sliver Quilts in which she calls it "Make Yourself at Home")  and replaced it with a suitably-subdued-orange which doesn't grab all the attention.  Left to do?  Back, quilt, bind, embellish, and label . . . but it's a truly little piece:
 
So you see, I've made a start, and one of the things that is making this possible for me is machine-stitching the binding (see "Machine Binding", November 26, 2012).  Knowing I don't have to spend hours and hours laboriously sewing on binding makes me feel I really can work my way through my unfinished quilt pile and enjoy the process as well.

Thursday, March 14, 2013

Culinary Endeavors

Brrrr, it is a cold day!  The wind is gusting too much for a fire in our wood burning stove so we warmed up this evening with homemade soup and soda bread.  Both soup and bread were new recipes and both are keepers.  The soup is "Unstuffed Cabbage" soup and is, as its name implies, a tomato-based soup with meatballs and cabbage.  What I really liked is that the tomato soup part (never a favorite of mine) is quite mild and not the intense almost tomato paste flavor I think of with Campbell's soup.   Another fun part is the rice is inside the meatballs - quite neat, don't you think?  On the other hand this soup does need a bit more punch (and we didn't use enough cabbage).  Rarely having made stuffed cabbage, I will have to explore those recipes and see what else can be added to give the soup a little more flavor.
 
The soda bread while homemade came from a mix, I have to admit.  I didn't mind the very baking soda-flavored versions carried by the local grocery stores, but I thought it would be fun to try something different.  A week or two ago, I asked at the manager's "desk" if they were going to be getting any soda bread mixes in, and the answer was one of those maybe and maybe not types.  So I decided to order a mix from King Arthur Flour myself (I've had very positive results with some of their other mixes and packages arrive very quickly).  That's what I used this afternoon.
 
I chose to use a square pan instead of making the usual round loaf (it just seemed easier to put a square chunk on the plate with the soup bowl than the usual long oval slice) and used an old aluminum pan D discovered in his childhood home last fall.  Setting the timer for the minimum baking time I wandered off to continue my once-quarterly sorting, cleaning, oh-that's-where-that-is! tidy up of my sewing room.  When the timer went off and I opened the oven I was a bit concerned because the bread was much darker than the store made version.  However, when we had it with our soup we had to agree; the taste was terrific!  KAF's version is far less baking soda intense and is a darker, more dense bread with, we think, more flavor.
 
Our other culinary foray today, was one day late, but we started the brining of our point end brisket.  Not being Irish, we don't mind having our corned beef and cabbage on the 18th (the beef sits in the brine for 5 days).  And it gives us an extra day to look forward to it! 
 
It's a rather cabbagey month for us, but neither of us minds!

Wednesday, March 13, 2013

Crazy Quilt Block: Points to Remember

I've been working on the block with my mother's photo in it for this past week, and I've learned lessons that if I write down, I'll have a greater chance of remembering.  The block started out looking like this:
 
 
After a lot of work, it now looks like the photo below and is almost finished.  My mother was a voracious reader all her life and was also a librarian so I decided early on that I would embroider a book for her.  The project kept getting more and more complex until I realized the only way to do it was on another piece of fabric which could then be attached to the block like a piece of applique.  It sounded feasible.


Soon I realized the embroidery would have to been done on fabric with fusible web to act as a stablilizer. No problem there; it actually made drawing the book easier (point 1 to remember).  And because I used a stablizer with lines indicated on it, it made the embroidery easier after the pencil lines had been covered with thread. 
 
Once the picture was complete, I cut it out.  Since I didn't want to ruin all my work, I cut a quarter inch around the whole piece and cut the corners so the background fabric could be tucked behind the embroidery.  Are you still with me?  Good, because here's the part you have to think about - the layers.  One layer of embroidery fabric + one layer of stabilizer = 2 layers.  Tuck the quarter-inch stabilizer and base fabric under the embroidered picture; how many layers now?  Right, four.  Now place it on the CzQ block which consists of the backing fabric and the pretty orange (it may look reddish in this photo but it's a lovely burnt orange) fabric for two more layers for a grand total of SIX layers (point 2 to remember).  Now hand baste the embroidery to the CzQ block, and then, figure out what stitch would do the best job of both attaching the embroidery and hiding the tiny bit of stabilizer et al that is bound to show (as you can make out on the upper right of the top book where I let my stitches drift too far apart).  I chose to use a close blanket stitch and a thread that matches the burnt orange.
 
Now, imagine what it feels like when you have to stitch through six layers (point 3 to remember).  You will frequently use a punch and stab method of sewing rather than the usual one-step glide because the stitches are too tiny and the bulk of fabrics too great for gliding.  It has taken me three days to stitch from the top of the blue book, up one side of the open book and across the top.  I'm almost finished with the black binding on the upper book.

 
Would I do this again?  Absolutely (point 4 to remember)!  The blue book has my mother's full name (stitched in copper metallic thread as are the "gilt" edges of the pages which are yet to be trimmed - point 5 to remember) and the call numbers on the base of the spine are her birth and death years.  The pages on the top are legible (from my collection of fabrics with print, 2 pieces back to back and fused with web) and really say something.  There are six pages that can be turned (point 6 to remember). 
 
The marbled end papers are one of my flashes of rememberance of which I'm quite proud (remembering it is what makes me proud - you know how that is!).  It, too, is fabric from my stash, and it's been there for quite a while waiting for just the right project.  Finally, D's fingers should give you an idea of the size of this piece.  The size of the black book is 1 1/2" x 1 3/4".  The entire piece measures roughly 2 1/2" x 2 1/2".
 
 
Points to Remember (point 8 to remember)
 
  1. Draw on your stabilizer and use one that has lines if possible.  If not possible, consider drawing the lines before sketching the picture to be embroidered.
  2. Try using non-fusible web so the excess can be cut away thus eliminating 2 layers of fabric through which to sew.
  3. Punch and stab method of embroidery may need to be used so consider that when choosing both embroidery stitch and thread.
  4. Believe that the outcome is worth the labor because it is.
  5. Use even count linen for embroidery of letters or numbers, turn the edges under before embroidering, and machine stitch around every edge (if visible after embroidering, unsew machine stitching where it shows).
  6. Cut edges of pages or other pieces too flimsy to embroider with a wavy rotary cutter (pinking shears would do the job, too). 
  7. Tiny details while time consuming and labor intensive can take the final product from "Nice!" to "Wow, how'd you do that?" and simply give you both a warm glow and a great sense of accomplishment.
  8. Write down both what you did and what you learned so you don't forget!
  9.  


Tuesday, March 12, 2013

The Road to the Lake #8

Somehow I just managed to erase this entire entry.  The few times I've done this before, I was able to get back what I had written.  Not so with this entry.   Before I begin again, though let me add a note about the size of the canvas (important information I've left out of all of my entries about my paintings); The Road to the Lake is 15" x 30".
 

Suffice it to say, that despite my promise to myself, this painting is still not finished.  It was close, very, very close when I finished painting over the weekend.  Except at the end of the session when I had the following on my canvas,
I had a sudden revelation.  The shadows which I so dearly loved, were all wrong for the painting.  Almost everything I loved, the need for them in this composition, the ultramarine blue of them, the stark reality of them, was all that was wrong with them.  The only thing that was right was the need for them.  Every time I looked at the painting I hoped I would find that I was wrong, but every time, they sat there sullenly as though to say, "So, what d'ya want us to do about it?"
 
As I dragged this mumbling, sneering canvas into class, Sharon asked what I thought about my work now.  I told her.  She looked at me and said calmly, "You're right."

Grumble, grumble.  I went to work.  Did I start with the road?  Oh no.  More light on the distant mountain.  Small tree to left of farmhouse is less a contender for Christmas tree of the year, and its shadow is diminished.  More dark green in the leaves on the tree on the right.  Far end of the left side of the road given some definition.  Other pootling little things. All of that needed to be done, but you know what I was avoiding, "The SHADOW knows!"
 
Finally, I started working from the inside of the shadows out. Actually, I should have done it the other way around - worked from outside in - but no, I was going to make this as difficult as possible.
 
You know what the worst part is, don't you.  Even in its unfinished state (and in this photograph, out of focus - sorry!), it's already better.  Grrr!

Monday, March 11, 2013

Book Group and Realistic Fiction

This afternoon my friend from teaching days and I went to our monthly meeting of the YA Book Group.  We haven't met since January due to February vacation time, and I managed to think I had to read two months worth of books.  Fortunately I was wrong.
 
Our genre for this month was realistic fiction - my least favorite.  These are books about things that really do happen, and they are frequently a favorite with students.  They enjoy reading about people their age (these are young adult books, remember) who have problems that may be the same as the ones they or friends face to greater or lesser degree.  The books may also deal with problems they've never heard about or problems that make their own issues pale in comparison.  Because the characters in the books are their own age, they can recognize some of the errors in judgement and even appreciate some of the creative ways the characters deal with their lives.  Adult characters can also make points that if the reader's parents made, the suggestions/advice would be ignored.  Coming from a book adult, the help may strike a responsive chord.  For all the above reasons and more that I haven't mentioned, I truly appreciate the genre and what it can do for its intended audience.
 
But . . .   Here's an example of the subjects of some of the 15 - 20 books on the list:
 
  • death
  • teen pregnancy
  • cancer
  • death
  • suicide
  • bullying
  • alcoholism
  • death
  • sexual abuse by a parent
  • drug use
  • psychopathic behaviour
  • delinquency
  • death
  • mental illness
 
Are you beginning to see why I might find this a difficult genre?  There have been some incredible books over the years; books that are worth their weight in gold. 
 
BUT . . .
 
Reading those books, especially the very well written ones, takes a toll.

Sunday, March 10, 2013

Screens, Pancakes, and Planes

Recently I wrote about trying to find a particular pattern for a wall hanging that looked like a screen.  Eventually I found one for sale on eBay that looked as though it might be the one so I purchased it - and it is!   The "table runner" is the version we saw at the Gilbertsville Quilt Show.  The nicest thing is that I have the fabric I want to use to make this (table runner aka wall hanging) for D.  Ironically, I prefer the Hoffman pattern that I printed on that earlier entry to this one because, in the larger version of the one below, there are what I view as empty spaces (the yellow) between the print fabric.  A screen - even a Japanese screen - wouldn't have those regular openings so this one looks a little off to me.  It won't stop me from using the pattern, though!
 
Saturday D and I drove west out Rte 20 past Sharon Springs heading for the Stone House for our yearly pancake/waffle with fresh maple syrup.  This year they outdid themselves and both of us had the best pancakes (D) and waffles (me) we've ever had there.  The syrup was as always superb.  Because it is not yet the height of the Maple Syrup Festival and we arrived early, business was light so we didn't feel we had to move to make room for others to sit.  It gave us an opportunity to enjoy the scenery which included the planes you see in the next photographs. 
 
This is my favorite shot because of the old maple tree with its sap line, gnarled branch, and deep blue shadow. 
 

We never did find out where the flying club was from, but it didn't matter.  I've always loved planes though I have no desire to learn how to fly, and these looked so pretty clustered in the snow against the woods and the cerulean blue sky .


In this picture you can see the tracks made by the plane's skis made as it taxied to its chosen parking place (there didn't seem to be anyone flagging them in or to specific areas in the field).  We didn't get to see any of them actually land as they had arrived before we did.  And yes, they were all on skis.

It was a perfect day for a ride, crisp, and cold but not uncomfortably so.  Imagine what it must have looked like from the air in one of these planes!

Thursday, March 7, 2013

Shadow Play

This is probably going to be a frustrating entry to read.  You see, the picture I'm going to be talking about is too large to scan on my printer; the paper itself is too big and therefore won't go on the printer's glass.  Bear with me as I try to explain what I mean by the title "Shadow Play".
 
I am working on a study for another painting, the one I thought I would work on concurrently with "Road to the Lake".  Clearly, that didn't happen.  Partly a logistical problem - remember those word problems in math?  If A gets on the train at point 9 and B gets on the train at point 3, who eats his apple faster? This will sound like that.  If I have a wet painting on my easel, where do I put that painting in order to begin a new one?  If I have two wet paintings, how many bottles of Windex should I buy?  Seriously, the wet paintings part is a semi-problem.  The other, more serious issue is that I needed to study the subject more closely by drawing a second sketch.
 
My subject (a photograph from K's recent world travels - and I have permission to use it) is an alcove with a bookshelf filling the space.  There are non-book objects on each shelf and a curtain looped back to the side of the alcove.  Very dramatic, super colors, terrific choice of subject in an awesome photo.  And one reason it is so dramatic is that there are two light sources from two different angles.  Each light casts a shadow in a different place within the same narrow alcove.
 
You see, each light source creates its own shadows so when the lights are close, they cast overlapping shadows.  Well, that may not sound too bad, but the shadows not only overlap, they are of differing intensities.  And that means that one shadow is very dark and the other one is lighter.  Now think about the intersection of those shadows; you're right!  That area is still a different value - a medium. 
 
After Sharon pointed that out to me (I had noticed it, but hadn't really looked at the shadows or thought about them), I knew I had to draw the subject again and this time sketch the shadows also.  It was fascinating! 
 
Once this new painting is underway, I'll show you (and refer you back to this entry) how I'm dealing with the shadows.  Remember, then it won't be just a value problem (light or dark), it will then also be a matter of color.
 
Wonder if I'll still find it "Shadow Play"?


Wednesday, March 6, 2013

Pussy Willow Challenge

Late in February I posted an entry about a grafted pussy willow tree that we had just purchased.  It reminded me of the many iterations of pussy willows throughout time in songs, poetry, paintings, needle work - the list goes on and on.  There is something so tender about the fuzzy catkins and the languishing branches.  Here is the photo I posted then:

 
We've been watching it since then and everyday those catkins have grown larger and larger as you can see in the photo below:


Now they really look like big puffs of cotton - but weightier, don't they?  I put the plant where the light would shine directly down on those catkins so you could get the impression of the yellow halo surrounding them - or so it looks from a distance.  Seen closer they become something else entirely:
 
 
How would you describe them? draw them? embroider them?  Now there's a thought!  What would choose to do: stitch colonial knots at the end of a straight stitch with YLI silk thread? or sew tiny seed beads all over and floating around a white mohair yarn oval with no visible thread attaching it to the catkin?
 
It would be a challenge, wouldn't it?

Tuesday, March 5, 2013

Again, No Photos - Rats!

A bit of a disappoint for me today; the photographs for this entry were taken too fast (we were getting ready to go out for a time) and therefore aren't as clear as they need to be. 
 
After today's painting class, I feel that the "Road to the Lake" is almost finished - maybe two or three more days (one of which will be for the final minute touches).  Perhaps my inability to get a decent photo is simply my subconscious saying, "Wait.  It's too close to the end and your subsequent work will be all those diddly things that may drive your readers mad."  Perhaps.  Or maybe it's just bad photos.  Who knows. 
 
Will I try to get a decent picture for you to look at tomorrow? Maybe, maybe not because there's always the crazy quilt blocks to discuss, also.
 
That was the second class of the day.  We saw a lot of incredible photographs of crazy quilts from the Abby Aldritch Rockefeller Folk Art Museum collection in Historic Williamsburg.  We also learned about many new products out there for applique and crazy quilting - some of which I can hardly wait to get my hands on!  Then there were new ways of doing time tested techniques and new techniques because of new products.  A new-to-us ribbon flower was demonstrated, and we all made a sample.  
 
Then we were able to share our own work, and it's as diverse as the group is.  Amazing what people who are really beginners at CzQs are doing - both in constructing their blocks (some ladies are new to quilting period!) and in their creative use of embroidery stitches the making of which may also be a new experience.  I've always loved looking at how other people learn and grow with experience and how everyone's work shows her (in this case "her" only) own personal flair. 
 
Did I take any photographs?  No.  Sigh.  Next class I will ask for permission to take and show you as much of the beautiful work as they will allow. 
 
If I remember.  Bah!

Monday, March 4, 2013

Happy Feet

Okay, this may seem odd, but even after having a good day of stitching on a crazy quilt block and deciding what I will do in art class tomorrow, my big excitement today is my new pair of sneakers.
 
First, do you remember what you paid for your Keds when we were young?  Do you consider sneakers something you wear for sports activities?  If your answer to those two questions is "yes", you may understand why I have been very reluctant to purchase a new pair of sneakers.  But my old ones now have holes through which water enters, and at this time of year, the water is cold.  Also, my podiatrist has told me that if I want to avoid as much pain as possible, I really must wear sneakers all the time (I have cheated but very rarely).  Fortunately with my relaxed life style, that stricture is not as horrible as it would have been were I still teaching.
 
It took a bit of time, but I only had to try on 4 pairs before finding one that fit me well.  It was a little disappointing that the brand name I had worn for five or six years now (I told you I was reluctant!) wasn't carried by the shop I was in.  I wound up with a pair of Brooks sneakers (no, they don't smell or look like barbecued chicken) in as sedate a color combination as it was possible.  If I remember I will take a picture of them to show you at some time.  I wouldn't have balked at florescent orange or neon lime green if I didn't have to wear them all the time, and besides, I don't think I need to have my sneakers clash with my clothing choice any more than they already do.
 
The nicer thing is that my feet are happy, and the nicest thing is that my wallet isn't as stressed out as I thought it would be!

Sunday, March 3, 2013

Quiet Joy in Everyday Life

The past three days have been busy but not necessarily busy with notable activities.  The visit to my sister-in-law was as one could expect: depressing, sad, and a bit scary.  Dementia is an evil disease.  A visit to the local winter farmers' market was fun made more so by being with D.  This morning was an unalloyed pleasure as I had brunch with some dear friends and laughed and laughed and laughed.  So much so that a woman from a nearby table commented on how delightful it was to see good friends sharing deep belly laughs together.  This evening was spent with a neighbor sharing a bottle of wine, some great cheese, and fellowship.
 
You know, just writing the above has made me feel better about not achieving anything momentous!  Cataloguing my activities and realizing how many joys there were hidden in some mundane doings makes me realize how lucky I am.  So while I didn't do anything earthshaking, I was given cause for a lot of quiet pleasure this weekend.  And I'm thankful for that.
 
My hope it that you have moments of quiet joy in your life and that you are able to take the time to reflect as I just did so you, too, can discover the gifts hidden in the clutter of everyday life.